
My Assistant


Posts: 1,541
Game: 


Posts: 1,541
Game:

 +
+ 


 /
/ 


 +
+ 
 +
+ 


Posts: 1,541
Game:
Posts: 1,541
Game:
Posts: 1,541
Game:
Posts: 1,541
Game:
Posts: 1,541
Game:

Posts: 1,541
Game:
Posts: 1,541
Game:

Posts: 1,541
Game:

Posts: 1,541
Game:
Posts: 1,541
Game:
 |
GW_vs_UnQ_g1m1.rec | ||
| Size: 625.63k | |||
| Number of downloads: 146 | |||
| Player Name | Side | Team | |
| UnQ`sherman |  |
1 |
|
| UnQ`Xarphan |  |
1 |
|
| GW|Fingolfin |  |
2 |
|
| GW|^Jamerson |  |
2 |
|
 |
GW_vs_WNx_Sniper_Dharka_vs_CGreen_giant_m1.rec | ||
| Size: 608.58k | |||
| Number of downloads: 139 | |||
| Player Name | Side | Team | |
| WNxCGreen | |
1 |
|
| GW|SnIp3R |  |
2 |
|
| WNxDaveGiant | |
1 |
|
| GW|^Dharkka |  |
2 |
|
|
4P_DOOM_SPIRAL.2007_06_03.20_10_20.rec | ||
| Size: 426.13k | |||
| Number of downloads: 106 | |||
| Player Name | Side | Team | |
| GW|Fingolfin | |
2 |
|
| GW|SnIp3R | |
2 |
|
| GW|^Jamerson | |
1 |
|
| tekwNts2Pl4y | |
1 |
|
 |
4P_JANUS_SAVANNAH.2007_06_04.19_56_35.rec | ||
| Size: 383.86k | |||
| Number of downloads: 123 | |||
| Player Name | Side | Team | |
| GW|Fingolfin | |
1 |
|
| GW|SnIp3R | |
1 |
|
| StupidTrainee |  |
2 |
|
| [DooC]GoDot | |
2 |
|
 |
GW_vs_DOM_Tiboraxx__Tau_SM_vs_Eldar_Chaos_.rec | ||
| Size: 312.2k | |||
| Number of downloads: 130 | |||
| Player Name | Side | Team | |
| GW|Fingolfin | |
1 |
|
| GW|^Jamerson | |
1 |
|
| [DOM]Bathory | |
2 |
|
| [DOM]Demon | |
2 |
|
Posts: 1,541
Game:


A guide to 2on2's by Fingolfin and Sniper
__________________________________________________
General
Strategies
General Tips
Special Combinations
__________________________________________________
Maps
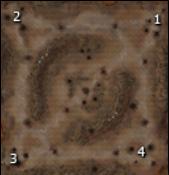
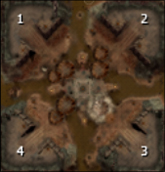
Doom Spiral
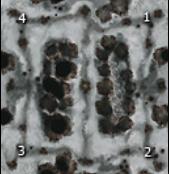
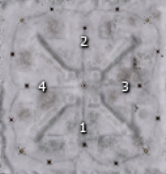
Ice Flow
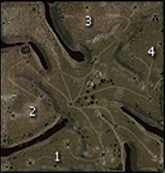
Panrea Lowlands
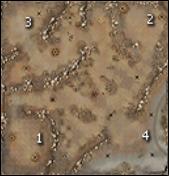
Jaunus Savanah
Tiboraxx
Dread Peak
Gor'heal Crater
Torrents
Biffy's Perill
__________________________________________________
Misc
Replays
Feedback
This post has been edited by GW_Fingolfin: Sep 25 2007, 09:01 AM
Posts: 1,541
Game: